Information on Traffic Count Status is available when selecting "Traffic Count Status" under the
"Thematic" heading in the top Menu bar.
Traffic Count Status: An explanation of the Control Panel terminology and an example search is
shown below the following images:
 |
- Video Cam Icon: Click this Icon next to "Traffic Count Status" heading to view a short video describing
available features in the Traffic Count Status queries.
- Output LRM: Select the desired LRM to display from the picklist:
- Spatial Filter: Select either 'Island' or 'Current View'; the 'Island' selection enables the
selection of the 'Island' in the "Area" dropdown below to make a map of; the 'Current View' option enables
creation of a map of the Traffic Count Status within the area shown in the Map details panel.
- Area: Select the desired desired Island to make a map of:
- Contract Year\Types: The first dropdown below this heading contains a list of the Contract
years available for queries; the second dropdown enables the selection of which type of contract to select
for the query: 'All', 'Program' or 'Special'.
- Contract Number: This dropdown contains a list of the available Contract Numbers to select from.
- Count Type: This dropdown enables selction of 'All' or 'Class' count type for the query.
- Count Status: This section will be completed soon...
- Make Map: Click here to see a map of the selected query parameters. See the example below for
more information.
- Make Map & Report: Click here to see a map and detailed report of the selected query parameters.
See the example below for more information.
- Export Contract: Click here to create a detailed report of a selected Contract to view or export
it to a Microsoft Access file. See the example below for more information.
- Backdrop: Before making a map, selecting Raster will display a low-resolution satellite image
under the resulting map. Selecting Vector returns the map to the normal view.
- Save Results As: Before making a map, checking this box will provide a zipped file for download
that contains Shape (shp) files, Design (DGN) files or Google Earth (KML) files.
Example: Traffic Count Status Search
The following sequence of steps show the process for performing a Traffic Count Status query:
- Select "Thematic/Traffic Count Status": The following dialog box will appear to inform the user
that initially the dropdown boxes will be populated with the total counts available for the entire state
but that subsequently the search can be narrowed using the Spatial Filter.
After clicking 'OK' on the dialog box, the Control Panel will be greyed out until the data has been gathered
and dropdowns have been populated.

- For this example the Spatial Filter is set to 'Island\Oahu'; Contract Year '2010' is selected and then the
Type 'All' is selected.
- Then the search is narrowed by selecting a specific Contract Number in the next dropdown - in this
example the Contract Number is shown in the Control Panel view at the top of the page.
- Under 'Count Staus', the Count Type 'All(243)' is then selected, followed by the Count Status of 'Counts
Complete'
- In the dropdown beneath 'Count Status' the selection 'All(7)' is selected, indicating 7 stations are
complete in this example.
There are then 3 buttons available in the Control Panel for making
maps and reports:
- If the first button - "Make Map" - is selected, the Map appears as shown below, with one station's tooltip
visible.

- If the 2nd button - "Make Map & Report" - is selected, the Map is the same as above, but there is a report
visible for viewing details of the 7 available stations.
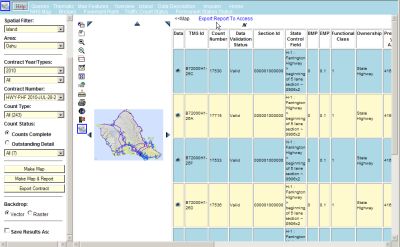
Two additional features are available from this Report view:
- By clicking the link at the top left of the report "Export Report to Access" this report can be exported
to a Microsoft Access file.
- Clicking one of the radio buttons in the column at the left side of
the report will provide a report on the Traffic Station AADT history and links to more information about the
traffic station selected.

- The 3rd button - "Export Contract" - enables the export of a Traffic Count Status Report for a specific
Contract Number to a Microsoft Access file.
Start by selecting the button "Export Contract". Then the following dialog box will appear for the
sequential selection of the Year, then Contract number and finally the Export button:
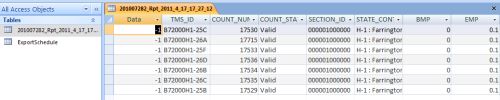
The final appearance of the dialog box is as shown below; clicking the link will produce the Microsoft
Access Report:
